cross ad

Friday 1 December 2017

How To Encrypt and Hide Photos, Videos and Files on Android

How To Encrypt and Hide Photos, Videos and Files on Android


Would you be willing to let another person browse your photo or video gallery? As digital data becomes more accessible and easy to carry, there’s an increasing demand for privacy. Sure, there are certain smartphone apps that allow you to lock and hide your personal data. But are they truly secure?
When you search the Google Play Store, you’ll find several “vault” apps that offer to keep photos, videos and other media files protected with a passcode (or pattern lock, fingerprint, etc.). We explored several of these apps, to find out whether they really secure the data with encryption or not.
In our tests, we imported photos and videos into different vault apps, and tried to recover them externally without unlocking them. Turns out, many of these apps do not actually encrypt the file, leaving them vulnerable, and easily recoverable without the passcode.
For instance, AppLock from DoMobile is one of the most popular app lockers on Google Play, but its app-lock screen can be bypassed in several ways, based on its on-device implementation.
Additionally, the Vault feature of the app is intended to hide your private photos and videos on your Android device. But as it doesn’t implement encryption, these hidden files could be recovered quite easily, by browsing the device storage using a regular file manager app.
On the other hand, a few security apps, such as Vault from NQ Mobile Security, claim to encrypt your data with passcode. But studies have shown that the popular vault app is quite easily crackable as it doesn’t implement a standard encryption algorithm.
So, if you really want to protect your private data, you should instead look for apps that use industry grade encryption algorithms (such as AES 256) to encrypt data on your Android device. Here, we’ve picked a few such apps that fulfil this requirement.
Additional write permissions required: Due to Android’s restrictions, certain third party apps don’t provide the option to delete files from external storage (SD Card). So, if you import files from the SD card into the vault apps, you may have to manually delete them from their original locations on your device.
To open a particular vault folder, you need to provide its specific password. Each of the files within the vault can be opened from within the app. It will first decrypt your file, and then provides a suitable app (from your installed ones) to open the file in.
If you want to transfer your Secrecy vaults to a different Android device, just copy the SecrecyFiles directory from the Internal Storage of your previous device and paste it in the same location on your new device. The vaults will still contain the same password.
Additional security options include the Stealth Mode, which allow you to completely hide the app icon from the App Drawer, enabling you to access Secrecy app by dialing a specific number from the Phone app. You can even change the default location of the vault to a custom one.
Being an open source app, Secrecy is available as a free download on the Google Play Store, but the developer is open to donations. And the Stealth Mode feature of the app is exclusively available only to those who donate.

SecureSafe – Highly Secure Online Storage Vault

SecureSafe is an award winning Android app for secure online file storage and password management. It provides strong AES 256 driven double encryptiontriple data storage, and zero knowledge architecture, ensuring one of the highest levels of security & privacy in the cloud.
With SecureSafe, you can store Passwords, PIN, Credit/Debit Cards, Banking Information, Images, Videos, Contacts and more, organized in different dedicated folders. All the data that is imported into the app is encrypted and uploaded to the SecureSafe servers, in such a way that no one except the user has any access to it. Being zero knowledge, the files are encrypted locally with your unique private key, and then uploaded to the server.
Even if an unauthorized person gets access to your encrypted data in the cloud, they can’t retrieve the original data from it, without knowing your associated private key. Additionally, your files are uploaded to the cloud via HTTPS, and are stored in high security Swiss data centres, one of which is located in a former military bunker!
Besides storing all sorts of data, SecureSafe features Data Inheritance, which ensures that business partners or family members can access the secure data on emergency. This needs to be activated via a web app. Refer this webpage for more information about setting up and using this feature.
The app lets you open PDF files in an encapsulated environment within the app, so that there’s no trace left of it on the device. It also lets you capture and encrypt photos and videos directly within the app. And with the SecureSend feature, you can encrypt and send files up to 2 GB in size to any recipient of your choice. The recipient doesn’t require the SecureSafe app to download and access the file.
One of the only downsides of this app, is that it majorly works online. Even though the app does have an Offline Login mode, it’s only meant to view the files that are encrypted on your current device. Any new password, file or other data that you need to encrypt, requires an Internet connection.
Your SecureSafe files are accessible across multiple devices, using the SecureSafe apps, which are available for Windows, macOS, iOS, Android, and Web platforms.
In the free mode, SecureSafe allows you to safely store up to 50 unique passwords, along with up to 100 MB of personal file storage. The PRO user can avail an unlimited number of password storage, and unlock up to 1 GB of personal data storage. The Silver and Gold plans can further increase the personal storage limit to 20 GB and 100 GB respectively. Check out the various available plans for SecureSafe, in this webpage. Also, there are separate plans for Business users.

Andrognito – Hide & Encrypt Private Files Easily in Android

Andrognito is a vault app that secures your private photos, videos and files using military-grade AES 256 encryption, and supports quick data encryption/decryption techniques. Thus, it strikes a good balance between security and convenience of use. The app can be protected by a PIN, passcode, pattern, or even fingerprint lock on supported Android devices. The access lock has to be configured during the initial set up.
During the initial setup, the app will ask you to sign up with your email address. You have to configure a security option to authenticate yourself. Within the app, users have the option to import photos, videos and other files into the Vault.
Once imported, the files can be accessed only from within the app. They are stored on your device using AES 256, which means intruders cannot retrieve data from encrypted files unless they have access to your private keys.
The app looks impressive in the way it looks (with Material Design and all that). But we noticed a particularly strange thing about the app. Whenever you reinstall the app on a different device, and use the same email to sign in to the app, it retrieves all the file names (along with empty placeholders) of all the files that you previously stored during your previous installation.
This means that the app does keep some sort of record of the files you import and encrypt in Andrognito. Although, the app developer doesn’t mention this anywhere. This poses a potential security risk as to what personal data is actually stored in Andrognito servers. And that’s why we are mentioning it at the end, even though initially it was one of our top picks in terms of security, usability and experience.
Encrypt and lock (hide) photos, videos and files on Android

Top 5 Things to Know About the iOS 11.2 Update

Top 5 Things to Know About the iOS 11.2 Update


The arrival of iOS 11.2 beta 6 means an official release is extremely close for iPhone, iPaIf you want to try the iOS 11.2 update out ahead of its release you’ll want to prepare. Early iOS software is usually riddled with bugs and iOS 11.2 beta testers have already discovered some issues with iOS 11.2 beta 1, iOS 11.2 beta 2, iOS 11.2 beta 3, and iOS 11.2 beta.
Apple’s also outlined several known issues in the latest iOS 11.2 beta release notes.
We’ve put together a pre-installation guide to the iOS 11.2 beta and it should help you avoid major headaches. If this will be your first time trying a beta, you’ll want to look that over.
If start noticing performance issues or iOS 11.2 bugs, you’ll want to report those issues to Apple so its engineers can improve the final release.
You’ll also want to take a look at our guide to fixing iOS 11 beta problems. You might be tempted to downgrade, but you should be able to fix some issues on your own.
Apple’s confirmed yet another iOS 11 update for its mobile devices. iOS 11.2 comes with a x.x designation which means it will bring a mix of security patches, bug fixes for lingering iOS 11 problems including an annoying calculator bug, and new features including Apple Pay Cash.
With an official iOS 11.2 release probably a few weeks away, the iOS 11.2 change log could change as Apple refines the software ahead of the official release. That said, it should be much bigger than iOS 11.1.2.
This guide will take you through the most important things to know, right now, about the iOS 11.2 release date, iOS 11.2 beta, iOS 11.2 release time, and the changes on board Apple’s iOS 11.2 update.

iOS 11.2 Beta

If you want to try the iOS 11.2 update ahead of the official release you can do so via Apple’s iOS 11.2 beta.
Apple’s released a pre-release version of iOS 11.2 for developers. The beta is currently available to developers and those enrolled in Apple’s Beta Software Program. The company’s Beta Software Program is available to anyone with a working Apple ID. It’s also free.

You Can Downgrade from iOS 11.2 Beta

Speaking of the downgrade, if you install the iOS 11.2 beta on your phone or tablet you aren’t stuck. You can downgrade to an official version of iOS 11 if it starts giving you problems.
As of right now, iOS 11.2 beta users can downgrade to six official versions of iOS 11: iOS 11.0.1, iOS 11.0.2, iOS 11.0.3, iOS 11.1, iOS 11.1.1, or iOS 11.1.2. There’s no way to downgrade to anything older than iOS 11.0.1.
So, if you make the move to iOS 11.2 beta from iOS 11.0 or iOS 10, you won’t be able to go back.
We expect Apple to close up at least some of these downgrade options in the near future so you’ll need to make your move rather quickly.
The downgrade process is rather straightforward and our guide will walk you through the steps beta users need to take in order to get off beta software.

iOS 11.2 Release Date & Time

We initially thought the iOS 11.2 release date could land in December alongside the HomePod because iOS 11.2 is bringing SiriKit for HomePod. A release in December is still possible, but the HomePod delay reduces the odds. The HomePod launch has been pushed into early 2018.
That said, now that we’re on the sixth iOS 11.2 beta, we’d expect the official release to be a few days away. We’d be surprised if it missed December.
The iOS 11.2 release date is difficult to pinpoint right now, but the iOS 11.2 release times, for both the official update and beta releases, aren’t.
Apple’s iOS 11.2 update will arrive around 10AM Pacific on release day. The company’s iOS 11.2 betas for developers and public beta testers will also arrive around 10AM Pacific.
Apple typically releases new beta updates every 1-2 weeks though the releases typically come faster once the company gets close to the final release date.
Here’s what the iOS 11.2 release time looks like for other regions in the United States and countries around the world including Australia, India, and Japan:
  • Eastern – 1 PM
  • Central – 12 PM
  • Mountain – 11AM
  • London – 6 PM
  • Moscow – 9 PM
  • New Delhi – 10:30 PM
  • Shanghai – 1 AM
  • Tokyo – 2 AM
  • Melbourne – 3 AM
  • Auckland – 5 AM
Remember, Apple never releases iOS updates, or betas, on the weekend and it typically avoids releasing new iOS software on Fridays.
Update : IOS 11.2 is now here and you can install the update to make your ios device faster and on the latest version.

How To Upload photos, videos older than 24 hours to your Instagram Stories

Upload photos, videos older than 24 hours to your Instagram Stories


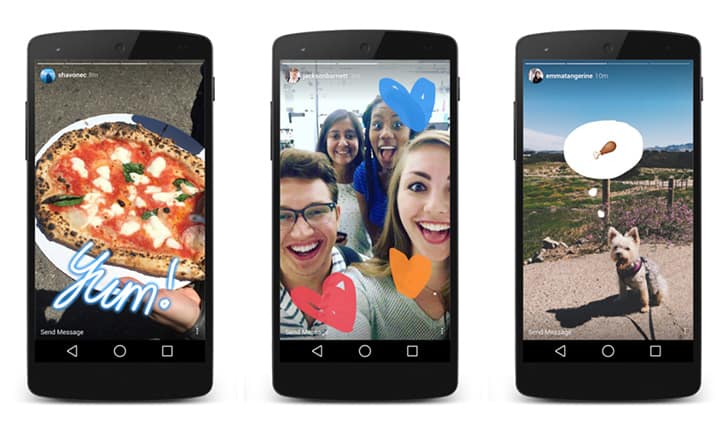
Ever since Snapchat introduced Stories, the popular feature has been adapted by Facebook in its various apps, including Instagram, WhatsApp (known as “Status”) and even Facebook itself. “Stories” lets you share a stream of photos and videos that have a lifespan of 24 hours, and automatically expire beyond that duration.
To upload a story, you need to tap on the “You” bubble from the Stories section on top of the screen, and then either snap new photos/videos that you want to include in your story, or pick photos/videos from Camera Roll (iOS) or Photo Library (Android), by swiping up from the bottom.
Now, here’s the catch. Instagram only lets you pick photos and videos from Camera Roll/Photo Library that have been shot in the last 24 hours. Anything older than that are discarded by the picker. So, if you want to create an Instagram Story using your older photos and videos, the app will not allow you to do that.
In this article, we’ll explore a certain workaround to let you use older photos and videos in your Instagram Stories.

Adding Old Photos, Videos to Instagram Stories – How it works

The workaround, we’re going to use, basically changes the timestamp of a particular photo or video, so as to trick Instagram into thinking that it was shot within the last 24 hours. Thus, Instagram lets you access the particular file from the media picker on the “New Story” screen.
This can be achieved on both Android and iOS. And the process is a bit simpler on Android compared to that on iOS. Here, we’ll demonstrate both.

Add old videos, photos to Instagram Story from iOS Camera Roll

In order to alter the timestamp of a photo or video to the current date, so that they are usable on Instagram Stories, either we need to edit its metadata, or save it again as a new file. Manually, this process might be somewhat inconvenient as it’s not so straightforward. So, we have created readymade workflows that help you to do the same easily.
You need to have the Workflow app installed on your iPhone or iPad, which is available for free on the App Store. Next, you’d need to install the two workflows, ReSave Photo and ReSave Video to your device by tapping on the “Get Workflow” button from your iPhone or iPad. The selected workflows will be added to the “My Workflows” section of the app.
Once this is done, the below steps will guide you to change the timestamp of photos and videos on iPhone and iPad, and make them available in the media picker for Instagram Stories.
  1. Open the Photos app and select the particular photo or video that you want to use in your Instagram Story.
  2. Tap on the Share button from the bottom and select “Run Workflow” option from the Action Extensions section of the Share menu. If the option is not available, tap on the More icon and turn on the Run Workflow extension from the list and tap on Done.
  3. Choose ReSave Photo or ReSave Video workflow, depending on the type of media you selected in Step 1.
The selected workflow will now execute and automatically modify the timestamp to the current date and time. Now, you can open Instagram, go into the New Story screen and pull up the picker from the bottom. The desired photo or video that you just processed should be available to pick. Repeat the same steps for all the photos and videos that you want to add to your Instagram Story, and they will appear in the story picker within Instagram.
Note: Both the ReSave workflows mentioned here, create copies of the original photos or videos. Hence, there will be duplicate files created in Camera Roll. If you want, you could delete the newly created duplicates soon after the files have been successfully uploaded to your Instagram Story.
You can achieve the same results using any app that allows you to re-save photos or videos with the current timestamp, or lets you modify the timestamp of the files.

Add old photos, videos to Instagram Story on Android

On Android, file timestamps can be changed to the current date and time simply by a file transfer operation. Thus, you can use an old photo or video on your Instagram Story, just by transferring the file to another random location.
  1. Copy or move desired photo or video that you want to add to your Instagram Story, from its original location to any other directory, using a suitable file manager app.
  2. After the file operation is completed, the timestamp of the file in the destination directory is automatically changed to the current date and time.
Thus, after the photo or video is transferred (copied or moved) from one directory to another, the picker available in Instagram Stories will allow you to select the particular photo or video for your new story. You can repeat the same process for all the photos and videos that you want to add to your story, and the same will be available for you to upload from the new story screen.
Upload photos, videos older than 24 hours to your Instagram Stories

Thursday 30 November 2017

Samsung Gear Sport And Fit 2 Fit 2 Launched

Samsung Gear Sport And Fit 2 Launched in India


Samsung today unveiled the Gear Sport smartwatch and Gear Fit2 Pro for the Indian audience on 29 November. It is quite clear that both these devices are targeted towards a niche set of users who are inclined towards sports and fitness. That doesn’t mean that regular users won't find these devices useful.
The Samsung Gear Sport and Gear Fit2 Pro
Both of the devices are quite appealing to look at (in my opinion) and are packed with a ton of features. Both the Gear Sport and Fit2 Pro had earlier been unveiled at the IFA event in 2017. I got a chance to test the devices first hand and here are my first impressions for both the Samsung Gear Sport and Gear Fit2 Pro. As the main attraction is the Gear Sport these impressions are directed towards it rather than the Fit2 Pro.
Gear Sport
Build and Design
Holding the device for the first time, both devices felt quite premium. The watch itself has a good build quality and Samsung has claimed that the Gear Sport has military-level durability.  However, the Gear Sports’ rotating bezel interface has made the experience of the device immensely enjoyable.
ADVERTISING
The bezel is far more effective at navigating than the touch screen interface of the watch and the subtle clicks made while rotating gives the bezel a soothing touch.
The design and build quality of the bezel and the strap feels premium.
To turn the screen on just twist your wrist towards your body slightly. However, quite a few times the screen did not immediately turn on when I flicked my wrist. You can always opt for an always on display in the settings menu, however it will come at the cost of a poor battery life.
Display and Specifications
The Gear Sport has a circular 1.2-inch 360x360 Super AMOLED display which is quite good to look at. The touch screen seems to work well but the small screen makes it difficult to correctly choose the required option. To be honest if you have fat fingers, you are going to have problems. Even, the rotating bezel is only meant for navigation on the smartwatch and not selecting any option.
The Gear Sport features the Always On Display by Samsung
The watch runs on Tizen OS, same as all the Samsung Gear smartwatches. In terms of specs the device has 4 GB of internal storage, 768 MB of RAM and a dual-core 1.0 GHz processor.  The Samsung Gear also supports wireless charging and the wireless charging dock is provided in the box.
Features
Coming to the features, the smartwatch has a heart-rate monitor and can automatically detect activities like sleeping and exercise. Along with this third party apps such as Speedo will also measure how many laps you have done while swimming. The Gear Sport is pretty much water resistant and can be used even 50 meters under water. There is also a barometer and altimeter built-in which is pretty nifty I’d say. The device has a 200 mAh battery, which the company has claimed to last for over four days on stand by mode.
The Gear Sport packs in some extras over the Fit2 Pro
One interesting feature with the Gear Sport is that it has NFC capabilities. This means that the device can be used for making payments via Samsung Pay. However, before that the device needs to be paired using Bluetooth with a Samsung smartphone. Based on the limited time with the device I found that it could play Music when paired with a headset, track your movement with its inbuilt GPS, give you fitness motivation for your daily exercise routine and lots more. Basically any fitness freak would definitely want to get their hands on this smartwatch.
Fit2 Pro
The Fit2 Pro is not that much different than the Gear Sport. Both of them have the same fitness tracking features like calorie counter, heart beat monitor, water resistance for up to 50 meters, barometer, fitness motivation, GPS and a music player. However, design wise the device has a rectangular 1.5 inch curved Super AMOLED touchscreen display.
The Gear Fit2 Pro is a slimmer and more affordable smartwatch offering from Samsung
The Fit2 also runs on the Tizen OS and has 4 GB of internal storage. However it has 512 MB RAM, which is slightly less than the Gear Sport. Other differences include lack of NFC and no altimeter. It also does not have the Always On Display of the Gear Sport nor does it have the wireless charging. Instead it is charged using a chord and adaptor provided within the box
Apart from that there is no difference between the two devices. Both serve the same identical purpose of giving additional resources for those who take their fitness seriously
Conclusion
Both devices feel pretty great and serve the fitness purpose that Samsung has targeted with these devices. So in the end everything comes down to the price. The Gear Sport has been priced at Rs 22,999 and the Fit2 Pro has a price tag of Rs 13,590.
The differences in price come at the cost of features.
Both devices have a similar set of fitness tracking features. But the Gear Sport edges out with the NFC ability, wireless charging and its rotating bezel. Is it worth paying the extra 10,000 on the Gear Sport for the above mentioned differences? Depends a lot on what you plan on using the device for. Stay tuned for our full comprehensive review which will shed more light on the matter.

Xiaomi's Redmi 5A launched at Rs 4,999

Xiaomi's cheapest phone Redmi 5A launched at Rs 4,999

\
Xiaomi launched the entry-level Redmi 5A in India today. Touted as 'Desh ka Smartphone', the cheapest offering from Xiaomi stables in India will be sold at an introductory price of Rs 4,999, which will be withdrawn some time later. The phone will have a starting price of Rs 5,999 after the scheme expires, the same price tag seen on Xiaomi Redmi 4A.
Apart from the price tag, the USP of the device is its long lasting battery. Xiaomi claims that 3000mAh battery on the Redmi 5A is good for a standby time of 8 days, or 7 hours of video playback.

As earlier indications suggested, Xiaomi redmi 5A will be 'Made in India' and will have some changes as compared to the version sold in China. Launched in October earlier this year, the Chinese model of the sports a hybrid SIM tray, where the Redmi 5A will ship with a dual SIM slots and a dedicated microSD card slot. Additionaly, Xiaomi is bringing a 3GB RAM/32GB ROM variant to India which is not available in China.
The Xiaomi Redmi 5A has now replaced the Xiaomi Redmi 4A which just released in the March of 2017.
Processor
The Redmi 5A is powered by a Qualcomm Snapdragon 425 quad-core chipset clocked at 1.4GHz. The device comes in two options, one with 2GB RAM, 16GB ROM, and another with 3GB RAM and 32GB internal storage. The chipset will also be paired with Adreno 308 GPU.

Design
When it comes to design, the device looks similar to the previous iteration. However, this time around the company has used a metal body instead of polycarbonate that was used in the Xiaomi Redmi 4A. Similar to other current generation Redmi phones, the antenna-lines have been pushed to the edges of the device, giving it a cleaner look altogether.
Similar to the previous iteration Xiaomi Redmi 4A, the company will be skipping on the fingerprint sensor for this budget oriented Redmi 5A.

Camera
The rear camera on the Redmi 5A sports a 13Megapixel module with an aperture of f/2.2. The camera comes with common features like HDR mode, panorama mode and burst mode. For the front camera, Xiaomi used a 5Megapixel sensor with an f/2.0 aperture.

Display
Redmi 5A features a 5-inch display with a resolution of 1280x720. The IPS LCD panel on the Redmi 5A is a multitouch display with a pixel density of 296ppi.
Connectivity
For connectivity, Xiaomi has placed a dual SIM tray which can either store two SIMs, along with a dedicated slot for a microSD card upto 128GB.  The device comes equipped with Wi-Fi 802.11 b/g/n, Bluetooth 4.1 and GPS with A-GPS, GLONASS, BDS, and a 3.5mm audio jack. The array of sensors on the device include an acccelerometer, a proximity sensor and ambient light sensor.
The Xiaomi Redmi 5A will also come with an IR blaster which can turn the device into a universal remote with the Mi Remote app.
Software
On the software front, the device will ship with MIUI 9 based on Android Nougat out of the box.
Battery
One of the biggest USP's of the previous Redmi 5A was its lasting battery and this time the company claims to have radically improved on that end. Xiaomi claims that the Redmi 5A can give a battery-life of eight days. Although the device sports a smaller 3000mAh battery, running MIUI9 and Qualcomm Snapdragon 425 helps the Xiaomi Redmi 5A with battery life.
Price
The Xiaomi Redmi 5A has been launched in Indian with a introductory price of Rs 4,999 for the  2GB/16GB variant, making it the cheapest smartphone Xiaomi markets in India. The offer stands for the first 5 million customers only. After the introductory scheme expires, Xiaomi will sell the device at Rs 5,999 for the base variant and Rs 6,999 for the higher 3GB/32GB variant.

How To Track shipment from multiple couriers with single app

Track shipment from multiple couriers with single app


When you are expecting a delivery from any courier or postal service, one of the biggest challenges you probably face is to properly track your shipment. Some courier services do provide you with a tracking ID, but generally, you need to manually check the status of your shipment. Unless the service has ties with a major e-commerce company, it is usually unlikely that you’ll find a dedicated tracking service that automatically keeps you updated with shipment status changes. Some services do provide mobile apps to give you push notifications for shipment status. But then again, if you usually receive frequent packages from multiple services, you’ll need to install individual apps for each of them. Also, most courier services don’t even have mobile apps.
What if a single app could provide integrated push notifications for all of your shipment status updates across multiple courier services from around the world. In fact, there are a few apps that already allow you to do so. In this article, we’ll explore some of these apps.

Aftership

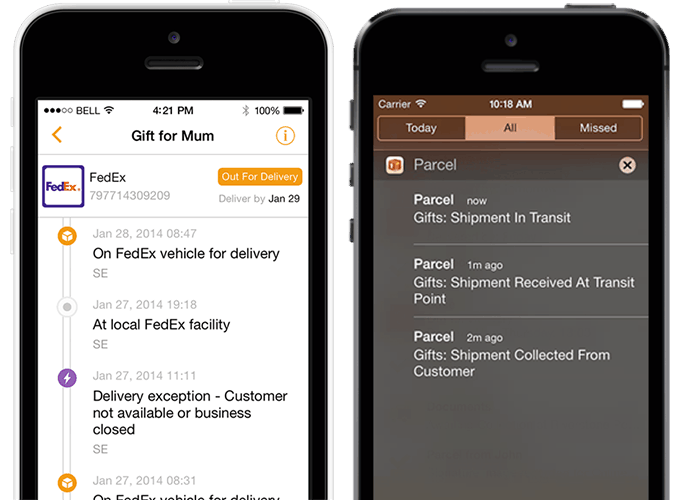
Aftership supports more than 235 postal and courier services from around the world and lets you track the status of your packages being handled by any of the supported services. Once you provide a valid tracking number for your shipment, it will automatically detect the courier name and fetch other details such as item to ship, shipping history, current status of shipment, etc. You can manually select the courier service name in case it is wrongly detected. Tracking ID can also be scanned using a built-in barcode scanner. It also gives push notification every time the status of shipment changes – Info Received, In Transit, Out for Delivery, Delivered, Failed Attempt, and any other delivery alerts from the courier service. In addition, the app also saves all your tracked shipments in case you want to refer to it at a later time. Supported couriers include FedEx, UPS Mail, USPS, DHL, Blue Dart, DTDC and many more popular services worldwide. Aftership is freely available on the App Store (iOS) and Android (Google Play).

Parcel

Parcel is another package shipment tracking app similar to Aftership which supports more than 240 courier and postal delivery services worldwide, including services like Royal Mail, HDNL, UK Mail, Yodel, Deutsche Post, TNT, UPS, USPS, FedEx, etc. Tracking data is collected in the server and pushed to the app, so that you get all your shipment notifications directly on your device. Like Aftership, it can automatically detect the courier name from the tracking number and can provide push notifications for changes in shipment status. Additionally, the delivery of package can also be viewed on a map. Parcel is available for free on the Mac and iOS App Stores, but this version only allows you to track up to three simultaneous shipments and does not provide push notifications. To unlock these features, you need to upgrade to the Pro version.

Slice

Slice is a great app for keeping track of all your online purchases. Though its shipment tracking capabilities are limited, with support for only a limited number of courier and delivery services, it’s actually more useful as a one stop destination for managing everything you buy and sell on the Internet. To use Slice, you need to register for an account and link your email address to it. Once linked, Slice scans your email for all your online purchase receipts and organizes them in various views, giving you detailed stats on your overall purchase trends. You can also track shipments from a limited number of popular delivery services including DHL, FedEx, UPS, USPS, Prestige, OnTrac, etc. Slice is available as a web based app, and is also available for iPhone, iPad and Android devices.
Track shipment status automatically from iPhone, Android


How To Record Android Screen with or without computer

Record Android Screen with or without computer


Android is usually known for having easy solutions and workarounds for almost everything you’d expect a typical smartphone to do; unfortunately though, screencasting is not one of them. If your Android smartphone or tablet is running a version below KitKat 4.4, there is no screen recording support for your device. But, if your Android runs KitKat or a later version of OS, this article will help you to screencast your Android device. Here, we’ve provided both rooted as well as non-rooted solutions.

Record Android Screen with Computer

Record Android Screen with ADB

If your smartphone or tablet runs Android 4.4 or later, you can record your device’s screen activity using the Android Debug Bridge (ADB) utility of Android SDK. ADB is a powerful command line tool for Android developers to help them debug their apps. But it is also useful for performing special tasks that aren’t possible from within the device itself. For example, you can install custom recovery on your Android with the help of ADB.
Here, we’ll use ADB commands to initiate screen recording on an Android 4.4+ device. This method does not require root access. The following steps will guide you to do so:
  1. Download and extract the Android SDK package in a suitable location on your computer.
  2. On your Android device, enable USB Debugging under Settings >> Developer Options. (See Note 1 for more details.)
  3. Connect your phone to the computer via USB.
  4. Navigate to the “sdk\platform-tools” folder of the extracted SDK using the File Explorer (Windows/Linux) or Finder (Mac).
  5. Open a Command Prompt / Terminal session from the current folder location. (See Note 2 for more details.)
  6. Once Command Prompt / Terminal launches, run a test command to test ADB connection: “adb devices
  7. If everything is okay, you should see your device listed. Next, run the following command to start screen recording on your Android device: “adb shell screenrecord /sdcard/example.mp4
  8. Here, you’re specifying that the recording will be saved as “example.mp4” in the /sdcard/ location of your device. You may provide any other path for saving the file. Now, perform the desired actions that you want to record. Press Ctrl + C when you’re done.
You can now retrieve the recording from the save path on your Android phone or tablet. The screenrecord commands also let you to customize the settings of the recorded file. Run this command to check out more options.
  • Note 1: If you don’t see Developer Options in the Settings menu, go to About phone / About tablet from Settings and tap on the Build Number a few times until you see the “You are now a developer!” message. You should now be able to see Developer Options under Settings menu.
  • Note 2: On Windows, hold Shift and right click inside the folder and select “Open command window here”. On Mac, open Settings >> Keyboard and go to Shortcuts tab. Select Services on the left pane and check on “New Terminal at Folder” option. Now select the particular folder in Finder, Ctrl + Click on it and select Services >> New Terminal at Folder from the menu. On Linux (Ubuntu), you need to install an add-on to get “Open Terminal here” option in File Explorer. Head on to this article for more details.

Android Screencasting with Miracast

Miracast is a WiFi Alliance based certification program that defines a standard protocol to connect to an external display (TV or monitor) over WiFi. If you have a Miracast certified Android device, you can record its screen using third party desktop based Miracast receivers such as AirServer. AirServer client is available for both Mac and PC. The free version of the software offers all the features of the paid versions, but requires an active Internet connection for operation

Record Android Screen without Computer

Android Screen Recorder

Recordable is an app available on Google Play Store that enables screen recording on your Android 4.4+ smartphone or tablet directly from the device itself, without requiring root. Though a computer is required to complete the installation process, screen recording can be done independently on your Andrpid device.
The installation takes place in two stages:
  • First, download the Recordable app from the Play Store and launch the app. Additionally, turn on USB Debugging option from Settings >> Developer Options.
  • Next, download and run the Recordable Installer on a Windows, Mac or Linux computer (Java Runtime required).
  • The setup will install Android drivers and ask you to connect the Android device over USB. It then scans for connected devices and activates the app.
    Once the app is activated, you can record on-screen activities on your device without requiring a computer. There is, however, one catch. If you reboot your Android, you’ll have to go through the setup process once again.
    Besides Recordable, there are a number of apps on Google Play Store, such as RecShou.TVScreen RecorderLollipop Screen Recorder (Android 5.0 only), etc. that allow you to perform screen recording on your Android device. But as mentioned before, unless you’re running Android 5.0 (L) on your device, you need root access for these apps to work. Android L has official screen recording APIs that make it possible to build such apps that work without rooting. All these recording apps usually allow you to configure various settings, like video size, recording quality, frame rate, countdown before recording and other customizations.
    Note that all these solutions mentioned in this article cannot capture internal device sounds while recording the screen. Some of these apps, such as Screen Recorder or Recordable, does allow you to record audio, but the audio recording source is the microphone rather than internal audio. If you need to record internal audio for screen recording, you can capture it from the audio output via line-in and use a suitable sound recording application like Audacity to record the sounds.
Android Screen Recorder

How To Encrypt and Hide Photos, Videos and Files on Android

How To Encrypt and Hide Photos, Videos and Files on Android Would you be willing to let another person browse your photo or video gal...